Story of Elegance
Welcome!
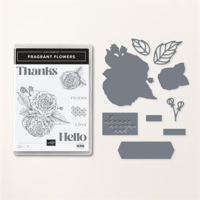
Today I’m sharing another card made with the Fragrant Flowers bundle. The bundle is comprised of the stamp set and coordinating dies of the same name. Did you know that you save 10% over individual prices when you purchase a bundle? Yes, it’s true. I love saving money whenever I can.
That’s one of the reasons that I joined Stampin’ Up because I could save 20% on all my purchases. I shared my passion and soon I was enjoying 25% off all my purchases. Woo hoo! The same offer is available to you too. If you want to start saving just click the join now button and start saving. There’s even more reasons to join when you do so during Sale-A-Bration. If you love saving money on your paper crafting products, check out the Sale-A-Bration information below.
Here’s the card I made:

Fragrant Flowers – Hello Friend #2
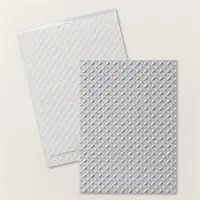
This super simple card is easy to make and comes together quickly. Between the embossed black background, the stickers and the gel pen dots there’s lots of texture too. It’s difficult to see in the images, but the black panel is embossed with the new Metal Plate 3D embossing folder.

A Closer Look
For the inside, I stamped and colored flower to coordinate with the card front.

Elegance Made Easy
Following are the quick steps to recreate this card.
First, make your cuts:
- Basic Black card stock – 4″ x 5 1/4″ emboss with desired folder. I used Metal Plate 3D embossing folder.
- Basic White card stock – 3 1/2″ x 4 3/4″
- Die cuts:
- None
Add the Basic Black embossed panel to an A2 card base made with Thick Basic White card stock. Note: An A2 card base is made by scoring a 5 1/2″ x 8 1/2″ piece of card stock scored and folded at 4 1/4″.
Stamp the Flower and Sentiment onto the Basic White folder using Memento Tuxedo Black ink, leaving space between the two for line stickers.
Color the flower using Petal Pink and Old Olive Stamping Blends.
Place 3 line stickers (available on Amazon) between the flower and the sentiment and to the side of the stickers. If you don’t have stickers you can use very thin strips of Petal Pink card stock brushed with clear Wink of Stella.
Use a Black Marker or gel pen to create a dotted background.
Add the stamped panel to the card front.
Add Petal Pink gems from the 2021-2023 In Color Opal Rounds.
To complete the project, stamp and color flower on the envelope front and flap to match the flower on the card front.

You can shop with me anytime to create your own fantastic projects!


HAPPENING IN JANUARY
PAPER PUMPKIN


Thank You is always appropropriate. Show of your style with our newest kit – Saying Thanks


Live Graciously!
