
Story of Elegance
Happy Tuesday Crafty Friends!
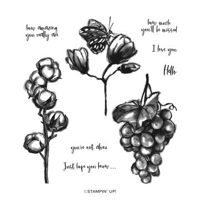
Crafting greeting cards allows us to express our creativity and send heartfelt messages to our loved ones. If you’re looking to add a touch of artistic flair to your cards, consider using stamped images that resemble charcoal sketches. This technique combines the convenience of stamping with the captivating aesthetic of charcoal, resulting in unique and visually appealing greeting cards.
Stampin’ Up! has crated the perfect set for us to use to accomplish this look – it’s called Softly Sketched. Aren’t these images just beautiful? It’s like having your own artist sketch book page to stamp with.

For my card today, I chose to stamp with black ink to create an image for my card that resembles a charcoal sketch. Here’s what I created.

I popped the Copper Clay panel up using Dimensionals to add visual interest.

A Closer Look
Elegance Made Easy
Following are the quick steps to recreate this card.
First, make your cuts:
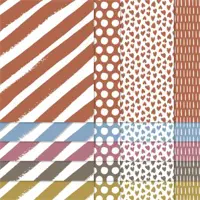
- 2023-2025 In Color 6×6 Designer Series Paper – 4″ x 5 1/4″ (I used Pebbled Path)
- Copper Clay card stock – 3 1/4″ x 4 1/2″
- Basic White card stock – 4″ x 5 1/4″ (inside)
- Die cuts:
- Use the second largest circle die from the Stylish Shapes die set to the floral image that has been stamped onto a large scrap of Basic White card stock, and to cut a circle into the upper portion of the Copper Clay panel.
- Use the two largest circle dies from the Stylish Shapes die set to cut a frame using Gray Granite card stock.
- Use the two smaller flag dies from the Stylish Shapes die stet to cut the Gray Granite card stock and the sentiment on Basic White card stock to create the sentiment panel.
- Punches:
- None
Adhere the Pebbled Path DSP panel onto the front of an A2 card base made with Thick Basic White card stock. (Note: An A2 card base is made by cutting an 8 1/2″ x 11″ piece of Thick Basic White card stock in half. Score and the 5 1/2″ by 8 1/2″ (half sheet) of card stock at 4 1/4 “.)
Add the the floral die cut to the front of the card. (Use the Copper Clay panel as a guide for placing the die cut on the card front.)
Assemble the sentiment panel beneath the opening on the Copper Clay panel. The bottom layer is the Gray Granite flag die cut, followed by Copper Clay Textured Ribbon, and then the sentiment die cut. Attach to the panel using tape runner or glue, then add dimensionals to the back of the panel and adhere to the card front.
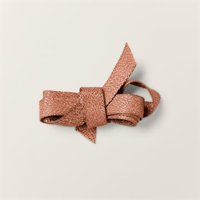
Finish by adding the die cut frame and a silver bow made with silver Simply Elegant trim.
For the inside, I stamped a flower onto the Basic White panel and a strip of coordinating DSP.

To complete the project, stamp a flower on the envelope front and add DSP to the flap to coordinate.

I tried this card with Lost Lagoon as the primary color as well. What do you think?


Finding Your Creative Elegance
In the end, the beauty of paper crafting lies in its ability to connect us with our own creativity and with others. It’s a chance to slow down, unplug, and create something beautiful and meaningful with our own two hands. So why not give it a try today? You never know where your creativity might take you.
If you would like to try your creativity with the products I used, you can shop with me anytime!


HAPPENING IN MAY
In Case You Missed It …….

ELEGANT SENTIMENTS TODAY YOU TUBE CHANNEL
Click on the image above to view the video of my latest You Tube Live. Check it out and if you would be so kind, please like, subscribe to my channel. I will be live every Thursday at 7:00pm EST. Thanks!
PAPER PUMPKIN

Show hospitality to all your guests with the Welcome Inn Paper Pumpkin Kit! This kit includes nine elegant and detailed cards—three each of three designs. Whether you’re hosting friends and family, or want to invite someone over, this kit has what you need to create sophisticated and elevated cards!
You can also pair this kit with a coordinating die add-on! (Available while supplies last. Stampin’ Cut & Emboss Machine sold separately).
ABOUT THE KIT
Name: Welcome Inn
This kit includes:
- All the supplies you’ll need to create 9 elegant and sophisticated cards—3 each of 3 designs—and 9 coordinating envelopes.
- A coordinating photopolymer stamp set with floral designs and friendly, hospitality-themed sentiments.
- A Night of Navy Stampin’ Spot and beautiful embellishments
- Lovely floral details and precut vases
Finished card size: 4-1/4″ x 5-1/2″ (10.8 x 14 cm)
Coordinating Stampin’ Up! colors: Balmy Blue, Boho Blue, Calypso Coral, Daffodil Delight, Early Espresso, Misty Moonlight, Night of Navy, Old Olive
This kit perfectly coordinates with the Countryside Inn Suite Collection (Item number: 161474).

Introducing the latest addition to the Kits Collection by Stampin’ Up!
Shake up someone’s special day with a happy, handcrafted shaker card! The Confetti Birthday Kit, the newest addition to the Kits Collection by Stampin’ Up!, comes with everything you need to quickly create confetti shaker cards—a total of 9 cards in 3 lively designs. Celebrate in style with bright, bold colors, confetti, and birthday greetings full of joy!


Live Graciously!
